By Chris Lent, NCAT Agriculture Specialist
It’s a chilly morning in late March and the seedling house heater kicked on several times overnight to keep the plants happy. The skies are cloudy as you get the kids to the bus and run to the hardware store. On the way back to the farm after your errands, you notice that the clouds are gone, the strength of the late morning sun taking you by surprise after what had been a cool late winter. Oh no… the seedling house! You rush home to make sure your plants aren’t getting cooked.
If you can relate to this scenario, it may be time to consider the benefits of automating the control points in your high tunnels and seedling houses. Those benefits include more consistent watering, less severe temperature swings, better production results, labor and energy savings, and better work-life balance.
The tools and systems available for automation are many and varied. The size of your farm, business goals, and lifestyle goals can all help inform decisions on the type and level of automation to move toward on your farm. A good first step is to identify components in your high tunnels and greenhouses that can be automated. For example:
- Heating (hot air units, boilers, hot water heaters)
- Cooling (ventilation fans, pad and fan cooling units, A/C)
- Humidity control (fans, roll-up sides, ridge vents, fog)
- Air circulation (horizontal airflow fans)
- Irrigation (pumps and valves)
- Lighting
- Thermal control (shade, screens, thermal blankets)
For many years, the default automation used in high tunnels and greenhouses on small to midsize farms relied on dedicated controls. Dedicated controls operate only one piece of equipment at a time. Examples of dedicated controls include in-line irrigation timers and individual thermostats for heating units or fans. These controls require monitoring and manual resetting as weather conditions change.
Integrated control systems are a newer alternative to dedicated controls. These systems use feedback from sensors and electronic processing to control the frequence and sequence of equipment operation to keep a tunnel or greenhouse very close to temperature and humidity set points. Once installed and programmed, they work autonomously. Integrated controls can operate motors for roll-up sides, ventilation fans, and heating units cooperatively with little manual input.
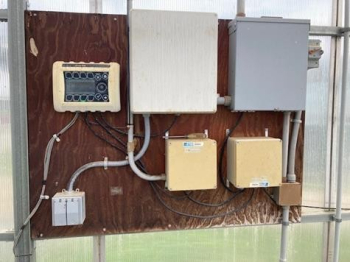
An integrated control system for heating and ventilating a seedling house on a farm in PA. Photo: Chris Lent, NCAT
Integrated automation systems can save costs in labor, decrease the risk of losing a crop, and save energy. There are many brands and styles of integrated control systems, so it can be time-consuming to search for the best option. If you have an established relationship with a trusted greenhouse supplier, they can help guide decisions on DIY automation projects.
Previously, it was primarily large-scale producers who used these kinds of systems, but there are now companies that offer design and installation guidance for smaller scale integrated automation systems. Some brands have screens on the equipment to enable the user to enter set points, while other brands rely entirely on Wi-Fi and a device app for user interface. These systems can range in price between $2,000 and $4,000 per tunnel or greenhouse depending on the complexity and the brand of the system. Some companies also lease system components to the farmer and will automatically replace parts of the system if they fail. This lowers upfront costs and decreases hassle for the farmer.
Fully integrated systems are something to aspire to, but most growers automate irrigation control and temperature and humidity control separately. For irrigation, a good example of a dedicated control is the simple, low-cost ($10 to $20) controls for irrigation in the form of in-line timers. You can purchase these from greenhouse supply companies, but garden centers and hardware stores also usually carry some version of these devices. They allow you to set an irrigation line to water for a certain amount of time, then automatically shut off.
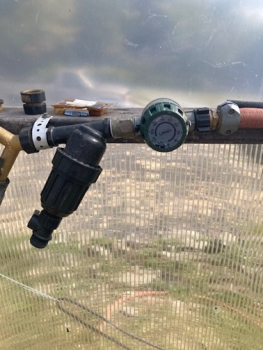
A dedicated in-line irrigation timer requires manual setting for each watering event in a tunnel. Photo: Chris Lent, NCAT
Battery powered digital programmable irrigation timers are available as well and can be sized to the irrigation line. These can cost from $100 to $150 for control over a single irrigation zone but give the grower much more control, and once programmed, they can give you freedom from the task of turning water on and off manually. Multi-zone digital controllers allow growers to control multiple valves in a more customized irrigation system.
Some tips to keep in mind for automation:
- Assess the need first: Count the number of heating, cooling, and ventilation units you will need to control and estimate the cost to manually control these.
- Get advice and pricing from greenhouse suppliers and companies that focus on greenhouse automation.
- Get quality sensors with solar guards and place them near the crop.
- Install an ambient air and soil monitoring system to monitor all growing conditions and send notices to your phone.
- Consider installing camera monitors so you can visually check conditions in a tunnel or greenhouse on your phone.
- Make sure your infrastructure is compatible with the automation system you want. Does it require electricity and reliable internet to work?
Automating the environmental controls in high tunnels and greenhouses can improve productivity and give some freedom from everyday tasks, but it doesn’t mean growers can become Ron Popeil and “set it and forget it.” Frequent visits to monitor high tunnel conditions and the health of a crop are still necessary. However, being able to rely on automatic control systems to manage conditions in a tunnel or greenhouse and being able to check those conditions and receive alerts from anywhere gives peace of mind when you decide to step off the farm.
Ultimately, choosing the right level of automation is about finding a balance that supports both your crops and your daily life. Whether you start with a few dedicated controls or invest in a fully integrated system, each step toward automation can reduce stress, protect your plants, and make your operation more resilient. Automation systems can’t fully replace a grower’s attention and experience, but they can serve as a reliable partner in maintaining optimal conditions, preventing costly mistakes, and creating more time for the many other demands of running a farm.
Related ATTRA Resources:
Season Extension Techniques for Market Gardeners
Sustainable Season Extension: Considerations for Design
Purchasing and Siting a High Tunnel to Extend the Growing Season
Organic Greenhouse Vegetable Production
Additional Resources:
Greenhouse and High tunnel suppliers:
High Tunnels Supplier Directory – HighTunnels.org
Integrated automation companies:
Link4 Controllers | Link4 Controls
Orisha | Get Your Tomato Yields Up!
Agrowtek Inc. :: Grow Controls for Greenhouses, Hydroponics & Indoor Growing
This blog is produced by the National Center for Appropriate Technology through the ATTRA Sustainable Agriculture program, under a cooperative agreement with USDA Rural Development. ATTRA.NCAT.ORG.